The Weekend ESP32 Internet Radio: A Full Build Guide
Build a streaming internet radio from a $9 ESP32 in one weekend. Complete parts list, wiring diagram, working code, and honest Amazon part picks — beginner friendly.
Hector Neal
PUBLISHED JUN 28, 2026 · UPDATED JUN 28, 2026 · 18 MIN READ
The complete parts list
Total damage: about $32 if you’re starting from zero, under $20 if you already own an ESP32 and a breadboard. Every link below goes to the exact listing I ordered from.
PARTQTYNOTESLINK
ESP32 DevKit V1 (2-pack)1Dual-core original ESP32 — not S2~$14 →
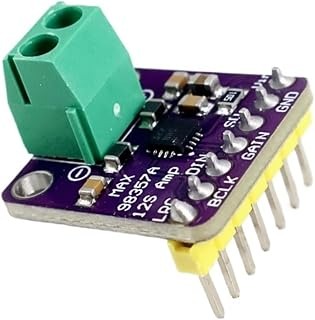
MAX98357A I2S amp1DAC + 3W amp on one board~$8 →
3W 4Ω speaker1Any 3W 4–8Ω works fine~$7 →
Rotary encoder w/ knob1Volume + station select~$6 →
Breadboard + jumper kit1Skip if you own one~$9 →
PRICES CHECKED JUN 28, 2026 · AMAZON LISTINGS CHANGE — LINKS GO TO CURRENT EQUIVALENTS
Why the ESP32 is perfect for this
An internet radio needs to do two hard things at once: keep a Wi-Fi stream alive and decode compressed audio in real time. The ESP32’s two cores split that work naturally — core 0 babysits the network buffer while core 1 chews through MP3 frames. A $9 board doing what used to take a dedicated decoder chip is still, frankly, ridiculous.
The other half of the magic is the MAX98357A. It takes clean digital audio (I2S) straight from the ESP32 and drives a speaker directly — no fuzzy analog output, no separate amplifier, three signal wires total.
Amp board photo
★ BENCH-TESTED PICK
MAX98357A I2S Amplifier Breakout
The part that makes this build sound good. DAC and 3W amp on one board, powered straight from the ESP32’s 5V pin. I’ve used the same one in four projects.
Check price on Amazon → ~$8 AT TIME OF WRITING
Wiring it up (breadboard first)
Five wires between the ESP32 and the amp, two to the speaker. That’s the whole electrical build. Here’s the map:
ESP32 PINMAX98357AWHAT IT CARRIES
GPIO 26BCLKBit clock
GPIO 25LRCLeft/right select
GPIO 22DINThe audio itself
5V / GNDVIN / GNDPower
My breadboard layout. Keep the speaker wires short — long ones pick up hum.
BENCH NOTE: If you hear a faint tick-tick-tick, your DIN wire is too close to the Wi-Fi antenna end of the board. Move it one row down. Ask me how many hours that one cost me.
The code: streaming in 40 lines
We’re standing on the shoulders of the excellent ESP32-audioI2S library. Install it from the Arduino Library Manager, paste this in, add your Wi-Fi credentials, and flash:
#include <WiFi.h>
#include "Audio.h"

Audio audio;

void setup() {
  WiFi.begin("YOUR_SSID", "YOUR_PASSWORD");
  while (WiFi.status() != WL_CONNECTED) delay(200);

  audio.setPinout(26 /*BCLK*/, 25 /*LRC*/, 22 /*DIN*/);
  audio.setVolume(12);            // 0–21
  audio.connecttohost(
    "http://ice1.somafm.com/groovesalad-128-mp3");
}

void loop() {
  audio.loop();                   // keep the stream fed
}
That’s genuinely it. Power it up, wait three seconds, and Groove Salad comes out of your speaker. The full sketch on my GitHub adds the rotary encoder for volume and a five-station preset list — but get this version working first. Small wins keep projects alive.
// FREE DOWNLOAD
Get the wiring diagram + full sketch as a PDF
The printable wiring diagram, the complete 5-station sketch, and my part-substitution notes — straight to your inbox. Then one email when a new build goes live. No spam, ever.
Send me the PDF →
Upgrades worth doing
- An OLED display for station name and volume — see my OLED wiring guide for the four-wire hookup.
- A printed case. Any small speaker-box STL works; front-mount the knob and it stops looking like a science fair project.
- A second speaker and a second MAX98357A gets you true stereo — the boards have a channel-select pin for exactly this.
OLED photo
★ THE UPGRADE I’D DO FIRST
0.96“ SSD1306 OLED Display (2-pack)
Four wires, instant “now playing” screen. The 2-pack matters — you will want one in your next project too.
Check price on Amazon → ~$10 AT TIME OF WRITING
FAQ
Do I need soldering experience to build this ESP32 internet radio?
No. The core build works entirely on a breadboard with jumper wires. Soldering is only needed for the optional permanent version at the end — and that's five joints.
How much does the ESP32 internet radio cost to build?
Around $32 in parts if you're starting from zero, or under $20 if you already own an ESP32 and a breadboard.
Can it play Spotify?
Not directly — Spotify requires a licensed client. It plays any open internet radio stream (MP3/AAC), which covers thousands of stations worldwide.
Which ESP32 board is best for audio projects?
Any ESP32 DevKit with the original dual-core chip works. Avoid the single-core ESP32-S2 — decoding MP3 while streaming Wi-Fi needs both cores.